New PID Build

  • 512 Views
  • Last Post 13 October 2022
  • Topic Is Solved
alphabrass posted this 08 October 2022

Thanks to hporter's informative post on PID temperature controllers several weeks ago, I put together one for my own use.  What a difference it makes!  As mentioned in that post there is lots of info on this in the "tube-a-verse".  Many reloading oriented, and not.  I found the videos in the "Hops and Barley Brewing" channel on PIDs very informative.

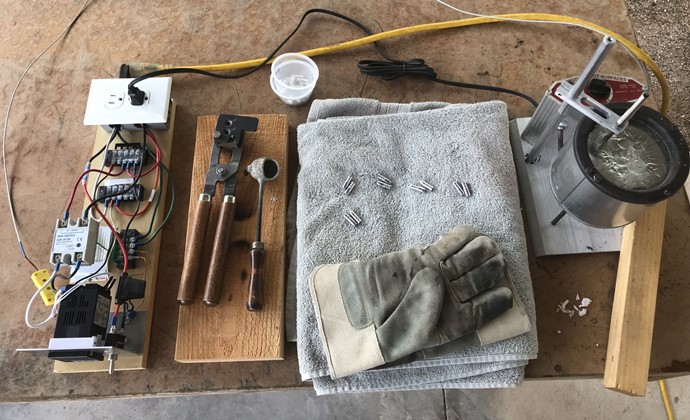
Mine will be complete when I add an enclosure.  The controller is an INKBIRD PID-SSA from the usual source.  The thermocouple probe that came with it was not suitable, one with a long probe was obtained.  If I were to do it again I'd put the SSR next to the outlet to give more room to make the connections to the PID.  The only problem I've had is that the on-off switch broke during the first casting session.  I also learned that the SSR is not a perfect switch, having a very low amperage leak when off, on the order of .03 amps.

I'm using the default settings for the controller.  The temperature ranges from -10 to +25 from the setpoint.  Are there settings that can improve on this?

alphabrass


PID Casting Setup

Attached Files

  • Liked by
  • dannyd93140
Order By: Standard | Newest | Votes
dannyd93140 posted this 08 October 2022

I have three and they make a world of difference; one for pot, one for the hot plate, one for the luber sizer.  

Attached Files

fc60 posted this 08 October 2022

Greetings,

After the melt is up to temperature, set the controller to "Auto-Tune" mode. Leave the setup undisturbed until the Auto-Tune light goes out.

This will adjust the P - I - D values to hold the temperature you set.

Once configured, the temperature should hold +/- degrees from set point.

Cheers,

Dave

Attached Files

alphabrass posted this 08 October 2022

Thank you Dave.

Attached Files

hporter posted this 08 October 2022

Good Job!


Is your thermocouple holder made from long stand off sections screwed together?  It looks nice and clean.


Attached Files

alphabrass posted this 08 October 2022

It is 12" of 1/2" dia. aluminum rod, turned down on the top end to have a sliding fit for the bracket.  It is bolted to the melter from the underside of the base.  The bracket is threaded to take the thermocouple and slotted on the rod end.  A cross bolt tightens the bracket.  Maybe a bit over what is needed, making this kind of thing is part of the fun.


Attached Files

hporter posted this 09 October 2022

It turned out very nice.  Congrats.

Attached Files

Sevenfan posted this 13 October 2022

Nice work! Really like my homebuilt PID, use it for salt bath annealing and casting.

Attached Files

Close